How to Make Resin Molds at Home: Your Complete DIY Guide
Resin casting with custom molds has surged in popularity as a favored method for crafting decorative items, like magnets, and jewelry. Many have tried making resin molds at home, but how to master it?
In this article, we delve into the process of how to create resin molds, exploring the steps from start to finish. Wondering what materials are best suited for mold making? What are the key considerations? Is there a faster way? Let's find out as we dive into the world of resin casting and DIY resin mold-making!
1. How to Make Resin Molds: DIY Step-by-Step Guide
Creating resin molds at home is easier than you think. Follow this DIY step-by-step guide to make your own resin molds:
Step 1. Preparing
First and foremost, here's a list of essential tools you'll need:
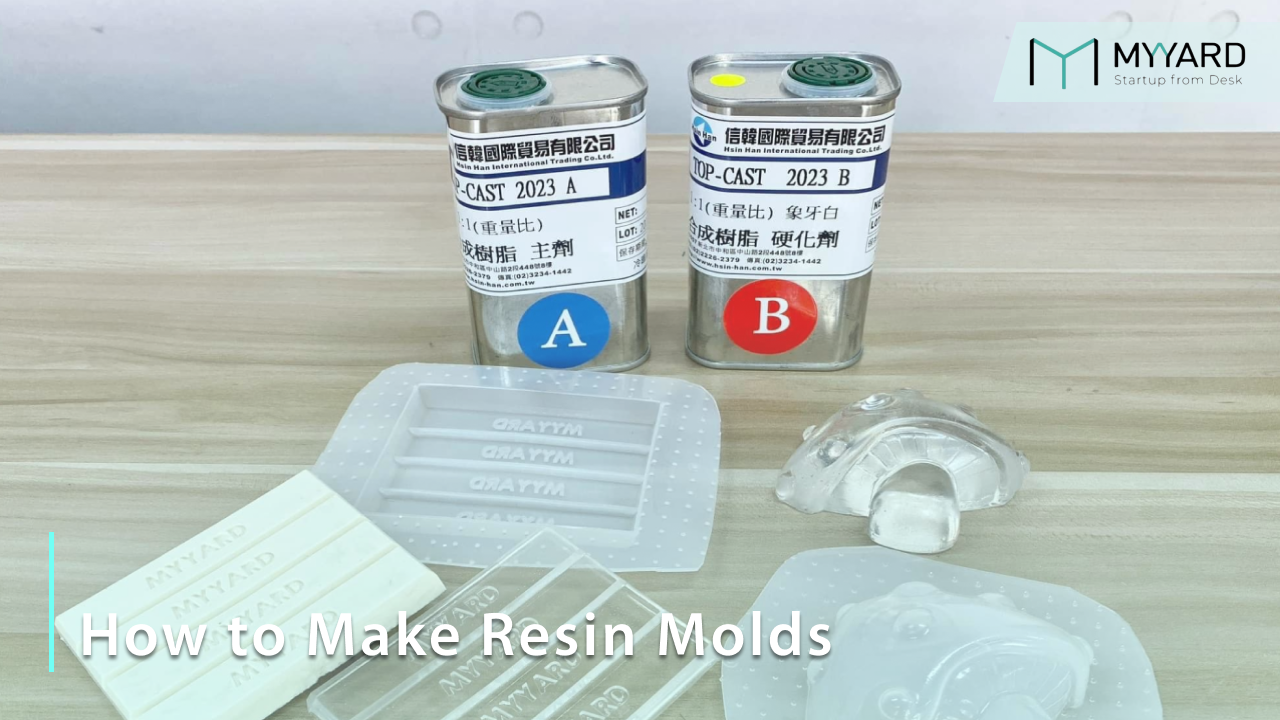
- Silicone mold-making kit (including Part A and Part B silicone)
- Mixing cups and stirring sticks
- Mold release agent
- Original design or object to be molded
- Housing for the mold (metal, hard plastic, or cardboard)
- Resin varnish or coating (if needed for glossy surface)
- Adhesive tape
- Scissors or cutting tool (for demolding)
- Soap and water (for cleaning)
- Heat gun (optional, for bubble removal)
There are still some important things to keep in mind before we get started:
- Wash your hands thoroughly to prevent any contamination, like hair or dust, of the silicone.
- Make sure your work surface is flat and level for a stable foundation.
- Aim for a design with a glossy surface to impart a shiny finish to your final product.
- For the housing, ensure that there is ample space on the sides and depth to accommodate the silicone. For example, baking molds for cakes or cookies are good choices.
- Also consider the size of your housing, to minimize wasting too much silicone.
Step 2. Building the Mold Frame
Apply resin tape to the backside of the housing to prevent any leakage of silicone. Carefully place it on a flat surface, ensuring stability during the construction process.
It is advised to use a glue gun, and meticulously coat the edges of the frame with glue, creating a barrier to contain the silicone and prevent any possible leakages.
Lastly for this part, put your mold face-up in the middle of the frame, leaving enough space around it to fill the silicone.
Step 3. Mixing and Pouring
For the filling materials, we use mold-making silicone as an example.
When preparing your silicone mixture, ensure to follow the manufacturer's instructions carefully as different brands might have different steps to follow. Typically, silicone comes in two parts, A and B, which need to be mixed in a 1:1 weight ratio for optimal results. The portion needed depends on the size of your frames. The two parts must be thoroughly stirred together for at least 3 minutes to ensure the whole material is properly mixed and to minimize the formation of air bubbles.
You can also use an electric mixer to help you with this process. Don’t forget to add pigments or acrylic paints at this point if you want to make resin molds in different colors.
Silicone does degas on its own, but it will take a certain amount of time. It is recommended to put the silicone in a vacuum chamber to speed up the process of releasing bubbles.
After mixing, it's time to pour the silicone into the prepared mold frame. Pour the silicone slowly and steadily, starting from one corner of the mold and gradually moving across to ensure even coverage.
Pay attention to avoid trapping air bubbles during the silicone pouring process. If there are still air bubbles, gently tap the mold frame on the tabletop to release them, or use a heat gun on low heat to help remove any trapped bubbles.
Step 4. Curling Time Demolding
Once the silicone has been poured, allow it to cure for a minimum of 4 hours before attempting to demold. Avoid applying direct heat to the mold during this time.
After the curing period, carefully remove the mold frame, trying not to damage the silicone. Use adhesive tape to clean any residue from the surface of the mold, and if necessary, gently clean the interior with soap and water. You can also use cutting tools, like a cuticle trimmer or scissors, to trim the edge of your mold to make it smoother and remove the extra silicone.
Then you can get flawless resin casts with ease.
2. 4 Types of Mold-Making Materials
There are several types of materials available for making molds, each suitable for different applications depending on factors such as the level of detail required and the type of material to be cast. Here are four common mold-making materials:
2.1. Silicone Rubber
Silicone rubber molds boast heat resistance, are ideal for withstanding resin curing temperatures, and they can be reused multiple times while retaining their shape. Although mold-making silicone cures quickly, it may crack with excessive handling and is flammable, yet they are food-safe and suitable for baking or making chocolate molds.
2.2. Polyurethane Rubber
Polyurethane rubber molds offer decent flexibility and tear resistance at a lower cost, but they're not as durable as silicone rubber molds. They're great for casting industrial parts like plaster and concrete, though they might not perform well in colder environments.
2.3. Latex
Latex molds are budget-friendly and renowned for their stability and ability to capture intricate details, making them a favorite for special effects props in movies. Despite their good tear resistance and user-friendly nature, they're not as long-lasting and can be vulnerable to damage from sunlight or freezing temperatures.
2.4. Silicone Putty
Silicone putty, a two-part mold-making material, delivers speedy results with its short curing time. It's safe for use with food, durable, and can withstand high temperatures, making it a versatile choice for various casting projects.
Compare Different Mold-Making Materials
Choosing the right mold-making material is essential for achieving precise results in various manufacturing and creative processes. Here's a comparison summary of different mold-making materials:
| Mold-Making Material | Features | Applications |
| Silicone Rubber | Heat-resistant, reusable, quick drying | Ideal for resin casting, baking, chocolate molds |
| Polyurethane Rubber | Good flexibility, tear resistance, cost-effective | Suitable for casting industrial parts, like plaster and concrete |
| Latex | Affordable, captures fine details, easy to use | Popular for special effects props in movies |
| Silicone Putty | Quick curing time, food-safe, durable | Versatile for various casting projects |
3. Different Types of Molds: 2 Parts vs. One part
After learning about the materials used in mold-making, delve into the intricacies of two-part silicone molds versus one-part molds.
Two-Part Silicone Mold:
A two-part silicone mold is a versatile option suitable for intricate designs and models with complex shapes. This type of mold consists of two separate pieces that are carefully aligned and joined together to create the final mold.
One of the main advantages of a two-part mold is its ability to accommodate undercuts and intricate details with high precision. The seam line, where the two mold halves meet, can be strategically placed to facilitate easier demolding and minimize casting imperfections.
However, creating a two-part mold requires careful alignment and assembly of the mold halves, which can be time-consuming and complex. Additionally, this type of mold typically requires more silicone material compared to a one-part mold, resulting in higher material costs.
Despite these drawbacks, the flexibility and precision offered by a two-part silicone mold make it an ideal choice for capturing intricate details and achieving high-quality castings.
One-Part Mold:
A one-part mold, also known as a single-piece mold, is a simpler option suitable for basic shapes and designs without complex undercuts. Unlike a two-part mold, a one-part mold is a single mold piece that encapsulates the original model. This type of mold is easier and quicker to make compared to a two-part mold, making it a cost-effective option for simpler projects.
However, one-part molds are limited in their ability to accommodate complex shapes and intricate details. The seam line in a one-part mold is fixed, which can result in visible casting imperfections along the seam line of the final product.
Despite these limitations, one-part molds are suitable for projects where simplicity and cost-effectiveness are prioritized over intricate detail and precision.
| Aspect | Two-Part Silicone Mold | One-Part Mold |
| Complexity | High | Low |
| Material Usage | More | Less |
| Cost | Higher | Lower |
| Suitable Shapes | Complex, Intricate | Simple |
| Demolding Ease | Easy | Challenging |
| Seam Line Flexibility | Adjustable | Fixed |
When deciding between two-part silicone molds and one-part molds, consider the complexity of your object, desired level of detail, ease of demolding, and whether you need multiple castings. Two-part molds are ideal for intricate designs and multipart objects, while one-part molds are more straightforward for single-piece items with fewer undercuts.
4. Is It Worthy to Make Molds with Silicone?
Making molds with silicone offers several advantages, particularly in capturing intricate details and allowing for customized shapes. Its flexibility and durability make it a popular choice for various projects, including resin casting, soap making, and even food-grade molds. Silicone is also heat-resistant, making it ideal for applications involving high temperatures, such as baking molds or casting heated materials. Additionally, silicone molds can be reused multiple times without losing their form, making them well-suited for small-batch or detailed custom work.
However, there are downsides to using silicone for mold-making. It can be expensive, especially when creating large molds or producing in bulk. The process of making silicone molds can be time-consuming, and curing times can cause project delays. Furthermore, silicone's relatively soft texture may result in less rigid molds, which may not be ideal for every application.
Despite these challenges, silicone's versatility, precision, and reusability make it a worthwhile option, especially when accuracy and durability are required for detailed mold-making projects.
5. Alternative Method of Mold Making: MY YARD FORMART Vacuum Formers
Manual mold-making can be a tedious and time-consuming process, often with limitations on customization. From measuring and mixing materials to waiting for molds to cure, the traditional method can hinder your creative flow. That's where MY YARD’s solution steps in, transforming the experience of how to make your own resin molds.
FORMART Smart Vacuum Former is a game-changer in resin craft. Unlike manual methods, it simplifies the process and ensures mold-making is faster, easier, and more accessible to create custom reusable molds.
FORMART utilizes LDPE (low-density polyethylene) plastic sheets to craft blister shell molds for casting purposes via thermoforming. Due to silicone's lack of thermoplastic properties, FORMART does not accommodate it. However, in comparison to silicone molds, LDPE shells exhibit significantly greater durability. While silicone molds typically endure only about 20 uses, LDPE shells can be reused hundreds of times or even serve as permanent molds.
The toughness of LDPE plastic requires careful consideration of mold release angles to facilitate demolding. However, another notable feature of FORMART is its automatic mold release function (applicable to specific models), eliminating the struggle of removing molds with a built-in directional valve that reverses and blows, simplifying demolding.
Additionally, LDPE material simplifies the production process, ensuring a clean workspace without the stickiness associated with silicone. Its compact design also saves significant workspace, while an industrial-grade vacuum pump ensures unmatched performance and efficiency.
Finally, a major advantage is the rapid mold-making process using LDPE, taking approximately 5 minutes, unlike silicone, which requires hours to cure.
Compared to manual mold-making, FORMART offers unmatched speed and efficiency. With exclusive flow control technology and two suction modes, FORMART offers flexibility and convenience for both beginners and experienced users. Say goodbye to long waiting times and hello to fast mold-making with FORMART. Its user-friendly interface and intuitive operation make it ideal for creators of all skill levels.
Check out how to use our vacuum former to make the moon planet lamp!

Find out how to use FORMART Smart Vacuum Former to build your mold for cute animal-shaped soaps!
6. Craft Your Dream Custom Molds with MY YARD FORMART Smart Vacuum Former
Learning how to create your own resin molds offers a wealth of benefits. Not only is it faster and easier than traditional methods, but it also grants you the freedom to create truly unique and personalized pieces. Anyone can become a mold-making master and bring their crafting dreams to life with MY YARD. Simplify your mold-making process and unlock endless creative possibilities with FORMART Smart Vacuum Formers! Contact us today to unlock possibilities!
Related Articles Suggested for You:

This blog post provides a thorough guide on creating resin molds, detailing each step from material selection to the molding process. The practical advice on mold-making techniques and troubleshooting is highly valuable for achieving precise and durable results. The clear instructions make it accessible for both novices and experienced mold makers.
From ZetarVac